Windows 安装 Boost Python 并使用 Visual Studio 2019 或 Clion 编译 (Python调用C++)
环境
- Windows 10 18363.476
- Visual Studio 2019 MSVC(14.2)
- Anaconda3 2019.10 x64
- Boost 1.17.0
- Clion
- GCC 8.2.0 (MinGW.org GCC-8.2.0-5)
Boost 安装
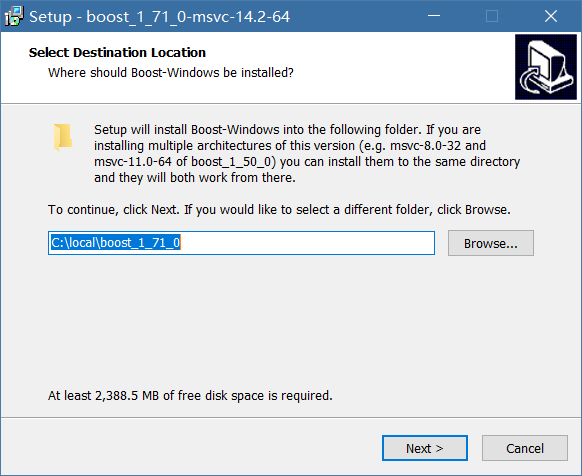
先安装 GCC (MinGW) 再到 Boost Binaries on Source Forge 下载预编译版本,这样能较少一些编译时间和出错概率,下载后安装,请注意对应自己的 MSVC 版本和 Python 的位数
安装完成后,运行 bootstrap.bat
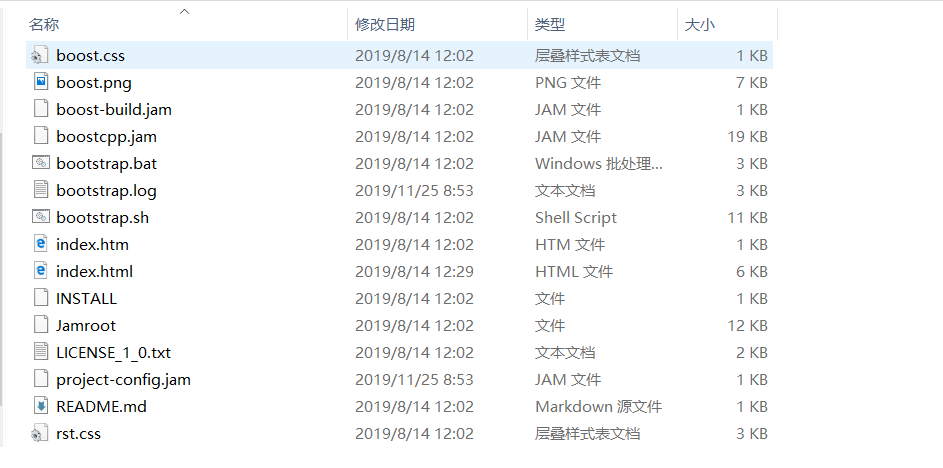
运行完成后,目录下会多出 b2.exe 网上有很多教程都停留在 bjam.exe 版本,这个是因为 b2.exe 是比较新的版本,两者的用途都一样,如果想知道具体的使用可以运行 PowerShell 并输入
1 | |
在进行 Boost 的编译以前我们需要定义 Python 的版本,默认下会自动搜索并使用 $PATH 中的路径,但由于我使用的 Anaconda 环境变量中的 Python 版本为 2,所以需要指定 Python 的版本,只需要将 Boost 根目录下的 tools/build/example/user-config.jam 作为模板复制到 用户的目录下(C:\Users\xxx\user-config.jam) 即可,下面是 user-config.jam 内容:1
2
3
4
5
6
7
8
9
10
11
12
13
14
15
16
17
18
19
20
21
22
23
24
25
26
27
28
29
30
31
32
33
34
35
36
37
38
39
40
41
42
43
44
45
46
47
48
49
50
51
52
53
54
55
56
57
58
59
60
61
62
63
64
65
66
67
68
69
70
71
72
73
74
75
76
77
78
79
80
81
82
83
84
85
86
87
88
89
90
91
92
93# Copyright 2003, 2005 Douglas Gregor
# Copyright 2004 John Maddock
# Copyright 2002, 2003, 2004, 2007 Vladimir Prus
# Distributed under the Boost Software License, Version 1.0.
# (See accompanying file LICENSE_1_0.txt or http://www.boost.org/LICENSE_1_0.txt)
# This file is used to configure your Boost.Build installation. You can modify
# this file in place, or you can place it in a permanent location so that it
# does not get overwritten should you get a new version of Boost.Build. See:
#
# http://www.boost.org/boost-build2/doc/html/bbv2/overview/configuration.html
#
# for documentation about possible permanent locations.
# This file specifies which toolsets (C++ compilers), libraries, and other
# tools are available. Often, you should be able to just uncomment existing
# example lines and adjust them to taste. The complete list of supported tools,
# and configuration instructions can be found at:
#
# http://boost.org/boost-build2/doc/html/bbv2/reference/tools.html
#
# This file uses Jam language syntax to describe available tools. Mostly,
# there are 'using' lines, that contain the name of the used tools, and
# parameters to pass to those tools -- where parameters are separated by
# semicolons. Important syntax notes:
#
# - Both ':' and ';' must be separated from other tokens by whitespace
# - The '\' symbol is a quote character, so when specifying Windows paths you
# should use '/' or '\\' instead.
#
# More details about the syntax can be found at:
#
# http://boost.org/boost-build2/doc/html/bbv2/advanced.html#bbv2.advanced.jam_language
#
# ------------------
# GCC configuration.
# ------------------
# Configure gcc (default version).
# using gcc ;
# Configure specific gcc version, giving alternative name to use.
# using gcc : 3.2 : g++-3.2 ;
# -------------------
# MSVC configuration.
# -------------------
# Configure msvc (default version, searched for in standard locations and PATH).
# using msvc ;
# Configure specific msvc version (searched for in standard locations and PATH).
# using msvc : 8.0 ;
# ----------------------
# Borland configuration.
# ----------------------
# using borland ;
# ----------------------
# STLPort configuration.
# ----------------------
# Configure specifying location of STLPort headers. Libraries must be either
# not needed or available to the compiler by default.
# using stlport : : /usr/include/stlport ;
# Configure specifying location of both headers and libraries explicitly.
# using stlport : : /usr/include/stlport /usr/lib ;
# -----------------
# QT configuration.
# -----------------
# Configure assuming QTDIR gives the installation prefix.
# using qt ;
# Configure with an explicit installation prefix.
# using qt : /usr/opt/qt ;
# ---------------------
# Python configuration.
# ---------------------
# Configure specific Python version.
using python : 3.7 : "C:/Users/Admin/Chocolatey/Anaconda3/envs/default/python.exe" : "C:/Users/Admin/Chocolatey/Anaconda3/envs/default/include" : "C:/Users/Admin/Chocolatey/Anaconda3/envs/default/libs" ;
主要是最后一行的 Configure specific Python version.
在完成了此内容以后,在此目录使用 cmd 或 PowerShell (推荐) 运行1
2.\b2.exe
.\b2.exe install
大概 5~15 分钟后,编译完成
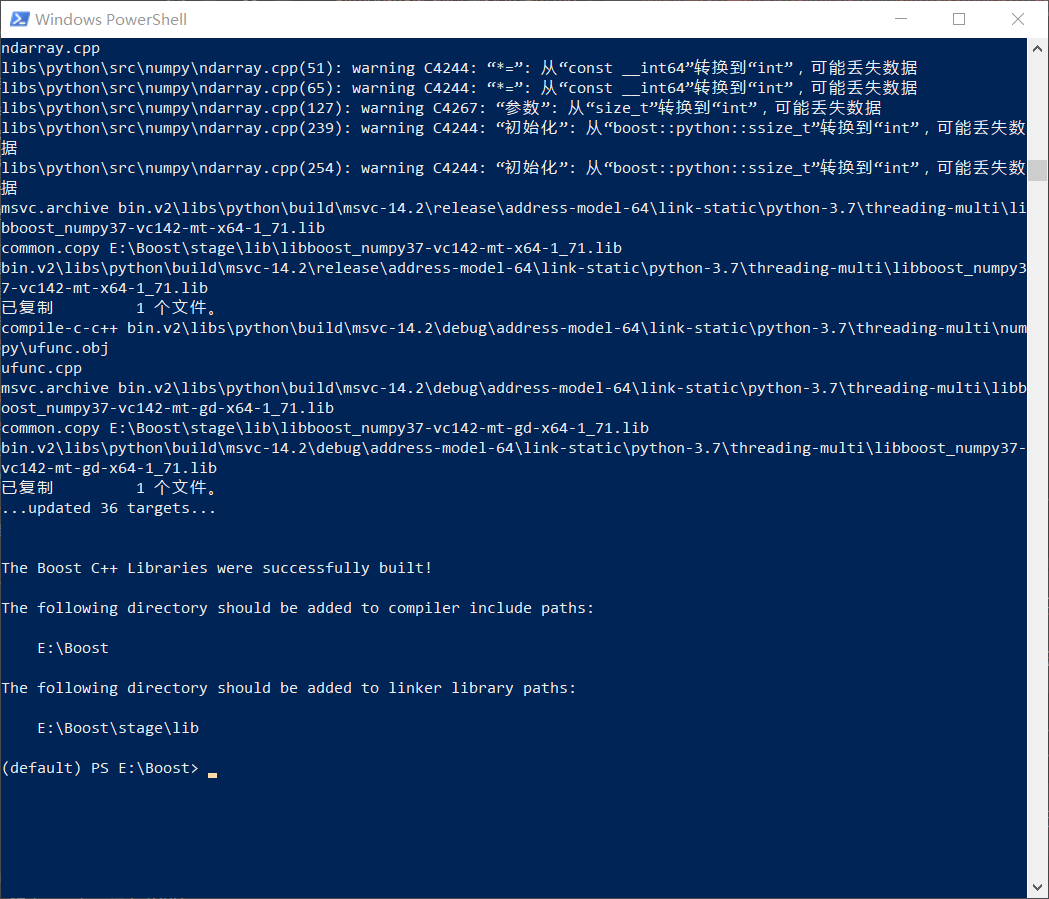
随后添加一个系统变量,设置 BOOST_ROOT 值为 Boost 的根目录并添加到 path 中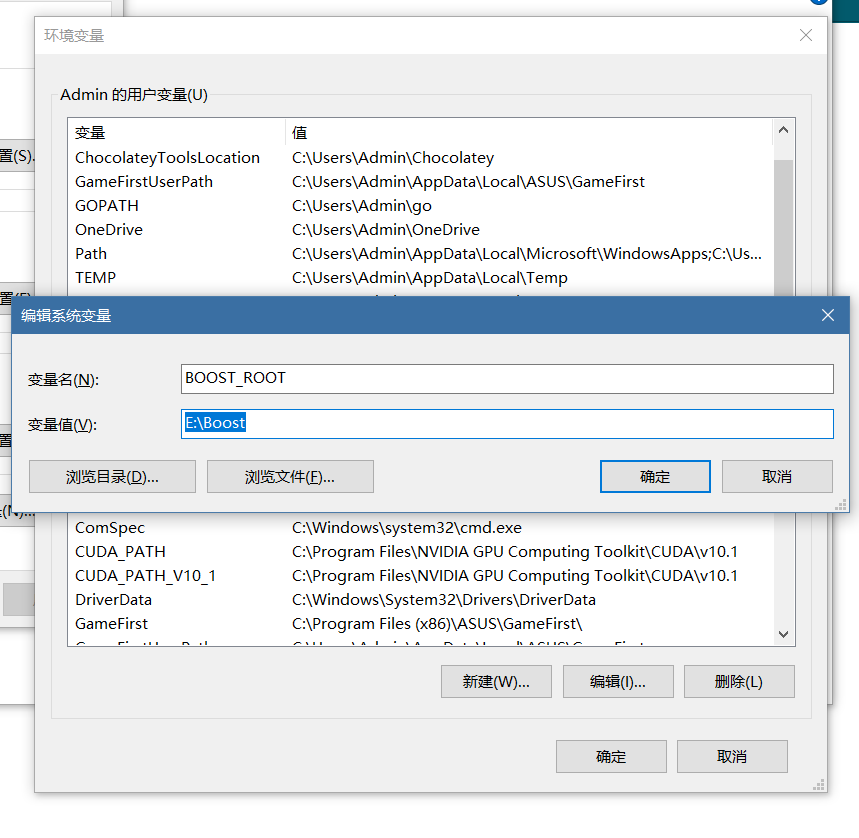
至此 Boost 的安装结束
Visual Studio 的设置
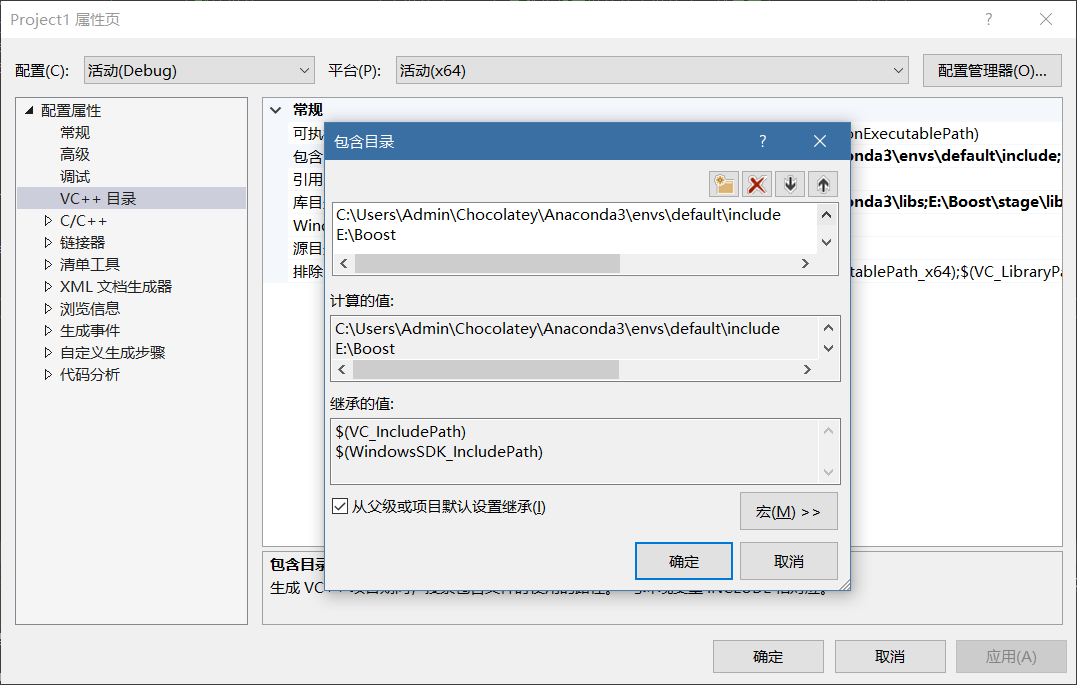
打开 Visual Studio 2019 新建一个 C++ 空白项目,随后点击 项目 -> 属性 -> VC++目录
设置 包含目录
Python IncludeBoost Root Dir
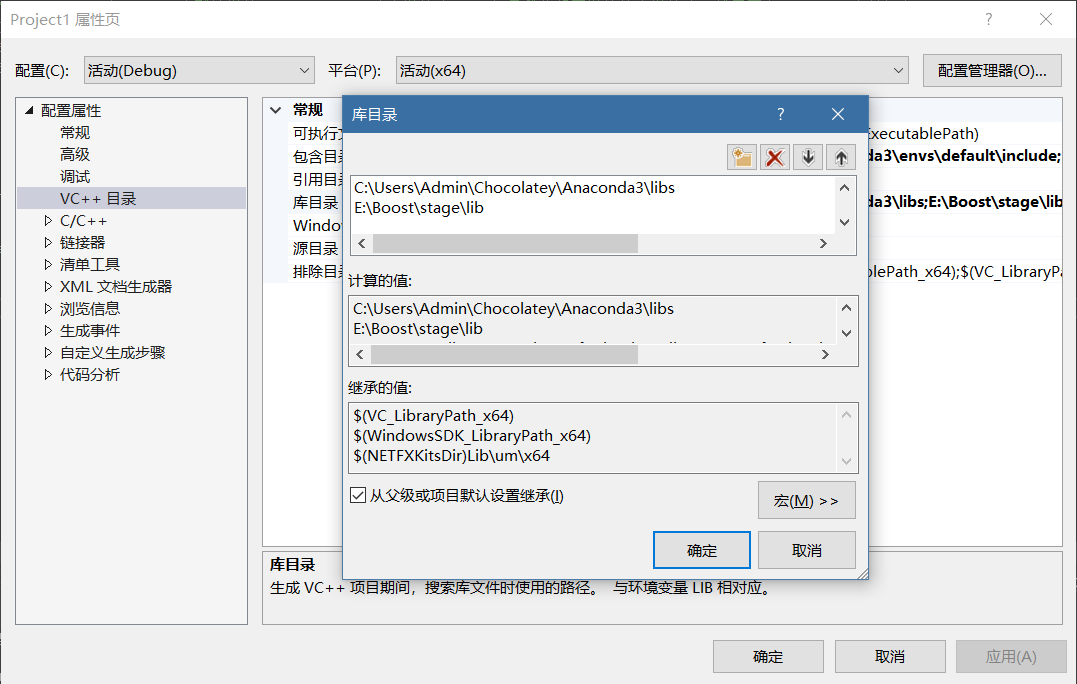
随后设置 库目录
Python Lib DirBoost Libs Dir
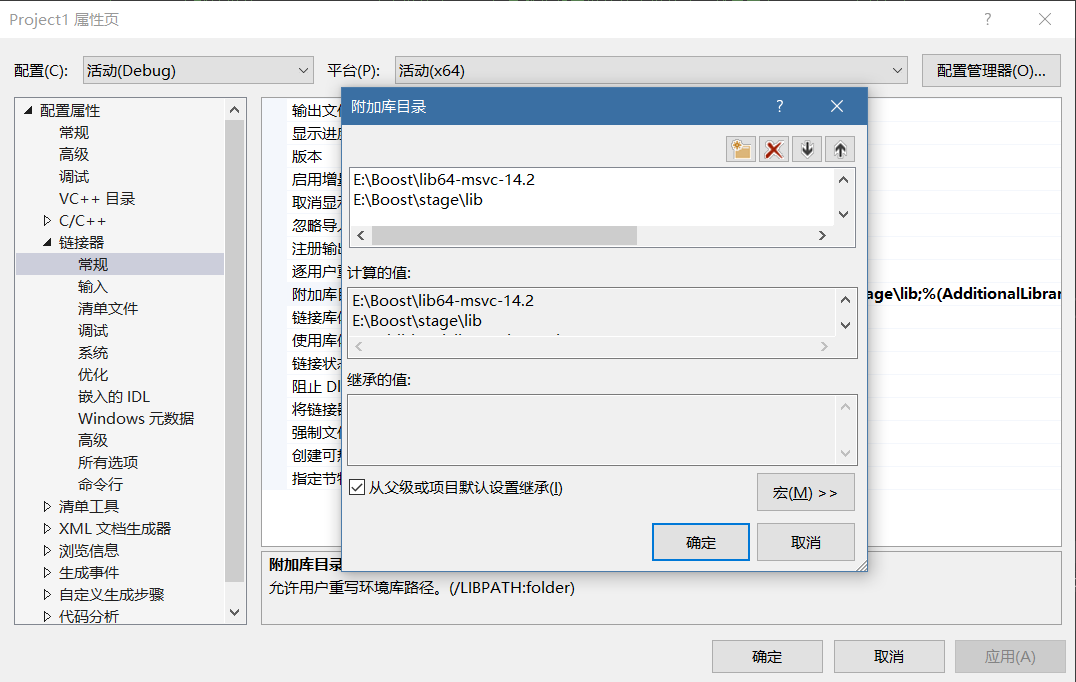
最后在 链接器 中设置 附加库目录
Boost C++ LibraryBoost Libs Dir
其中,Boost C++ Library 就是 Boost 根目录下的 libxx-msvc-xxx 文件夹,如 64位并且 MSVC 版本为14.2 该目录名为 lib64-msvc-14.2
至此,Visual Studio 的配置基本结束
Visual Studio 编译测试
在项目中创建 hello.cpp 源文件
1 | |
注意这里 BOOST_PYTHON_MODULE 的值为 hello_ext 这个待会用到
注意: hello.cpp 中的宏定义 #define BOOST_PYTHON_STATIC_LIB 非常重要,它可以指定链接 boost_python 的静态库,而不是默认的动态库。
在编译过程中遇到 LINK : fatal error LNK1104: cannot open file “boost_python37-vc142-mt-x64-1_71.lib”,但是已经引入了静态库,那么最可能的原因是 C++ 代码中漏掉了这句宏定义。
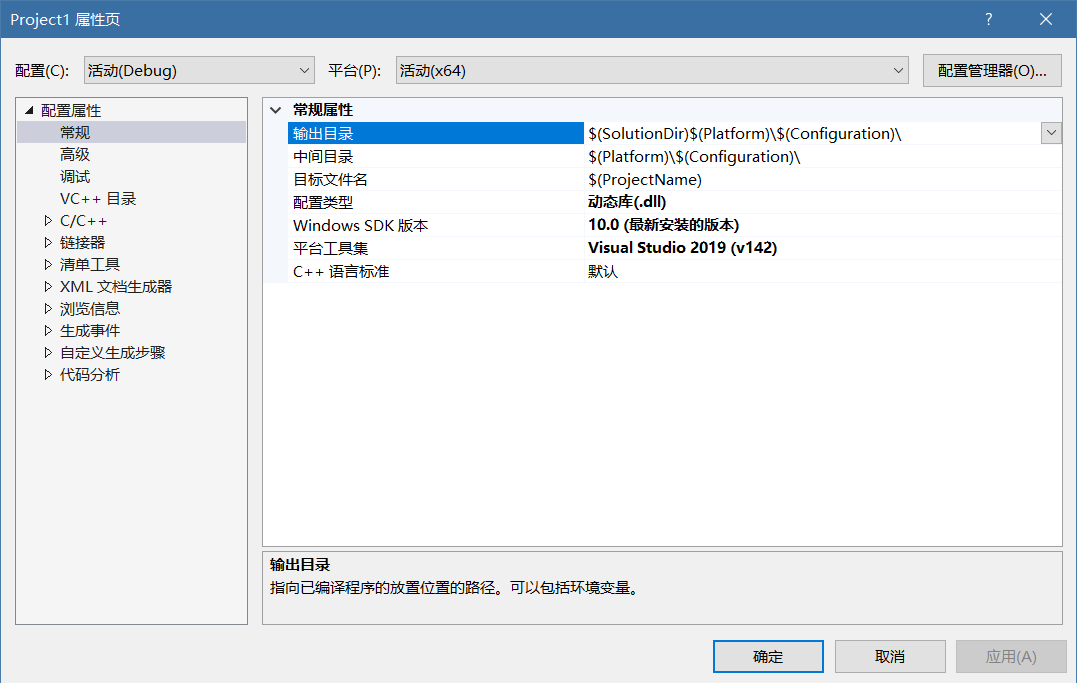
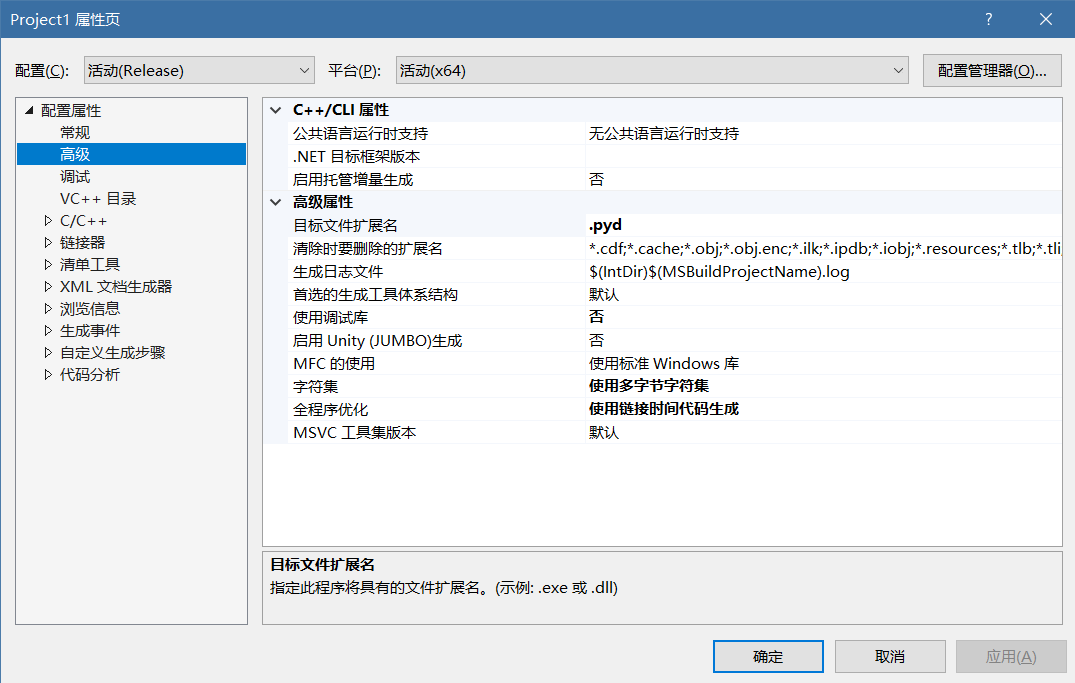
关于Boost静态/动态库的命名 随后附录会有说明。随后,设置项目属性中设置 配置类型
将配置类型设置为 动态库(.dll) 并在高级中设置目标扩展名为 pyd
再设置完成之后, 可以开始编译, 请选择与 Python 相符合的位数进行编译,并选择编译的版本 release 和 debug 如果运行 Python 时不是以 debug 方式运行,请使用 release 版本
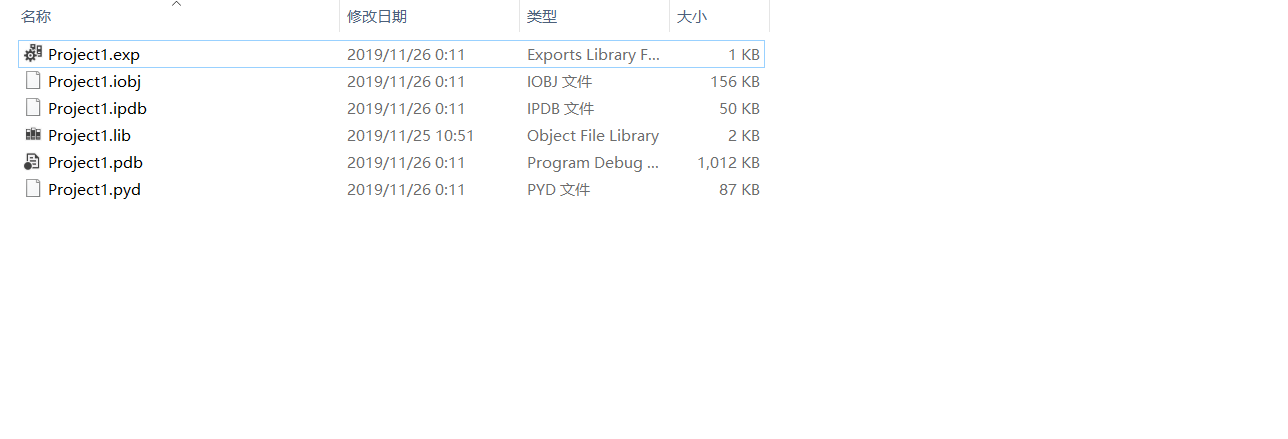
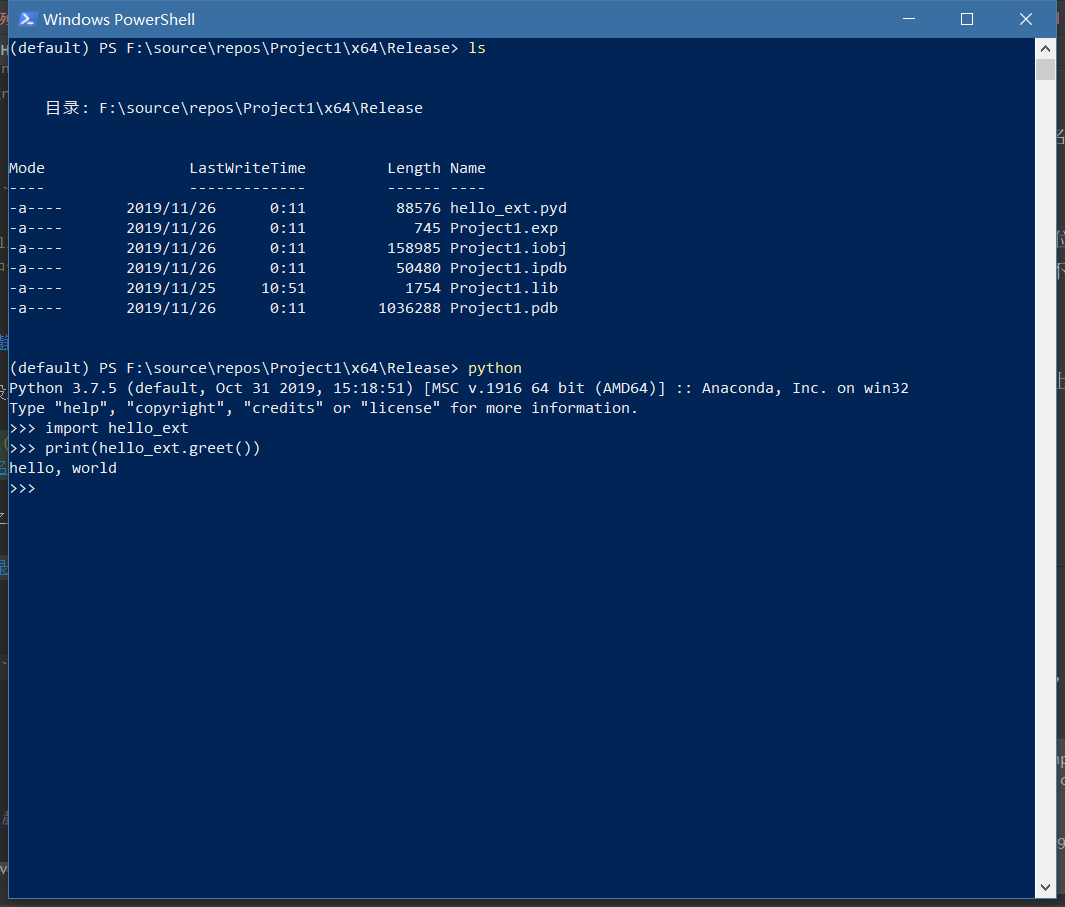
编译完成后, 我们看到多了一个 pyd 的文件, 将其重命名为上面的 BOOST_PYTHON_MODULE 值 hello_ext,随后使用 PowerShell 运行
1 | |
至此,使用 Visual Studio 编译 Boost Python 就完成了
Clion 的设置
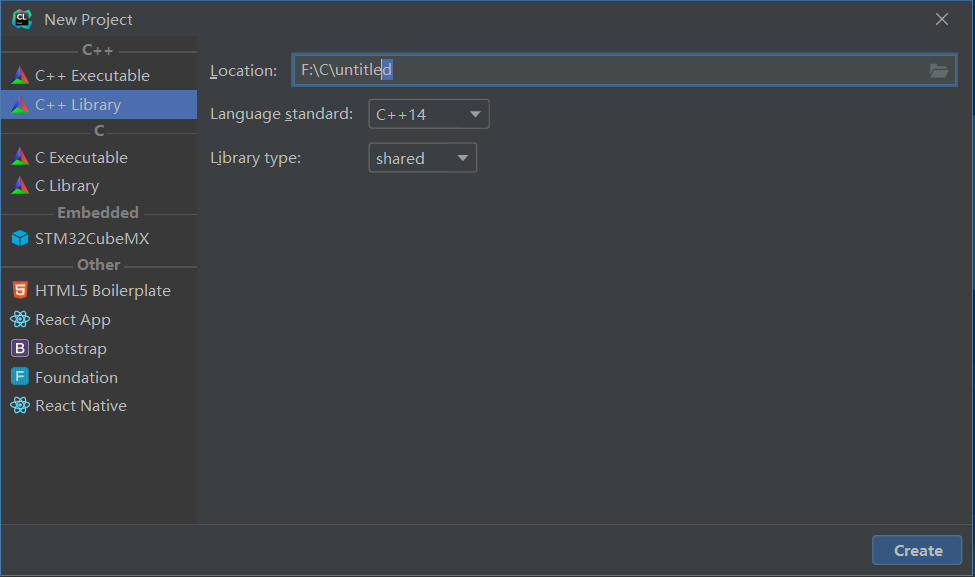
打开 Clion 新建 C++ Library 注意 Library type 选择 shared
随后,删除默认的 library.cpp 和 library.h,创建 hello.cpp, 内容与支持的一致
1 | |
Clion 的编译与测试
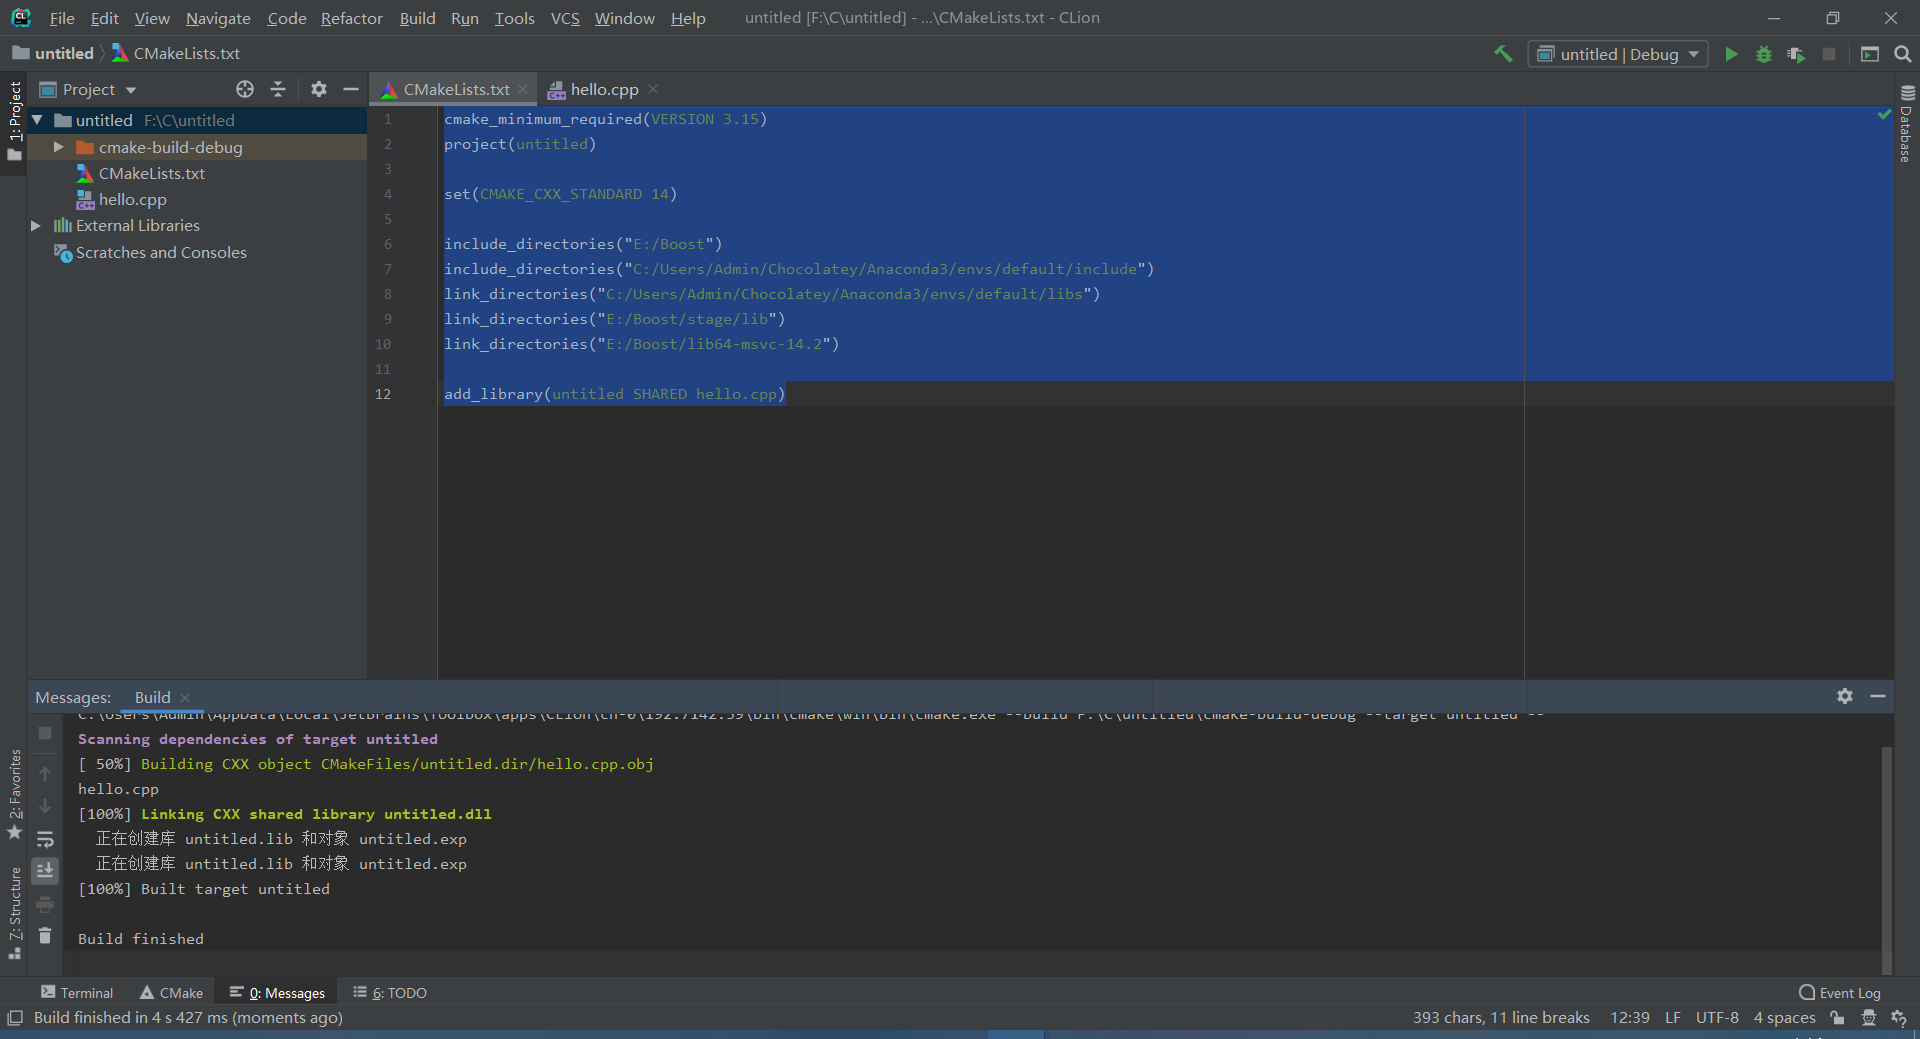
在完成了 hello.cpp 之后,需要设置编译器和 CMakeLists.txt,内容如下
1 | |
关于其中依赖路径的设置可参考 Visual Studio 版本的设置
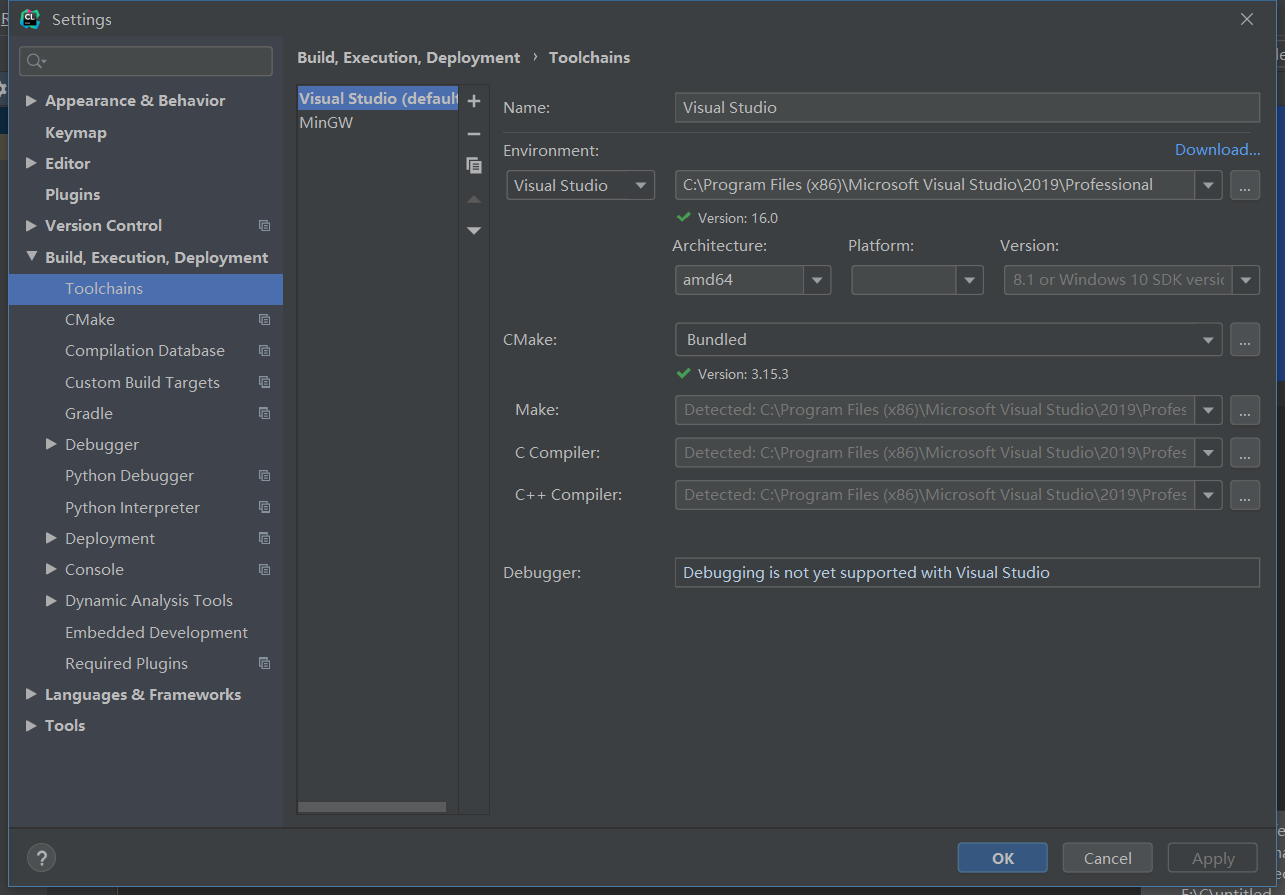
随后,打开 Settings-> Build, Execution, Deployment -> Toolchains 中设置编译器为 Visual Studio,一般来说无需过多配置,Clion 会自动识别,只需要选择生成编译的架构位数即可,这里选择 amd64
设置完成后,开始编译
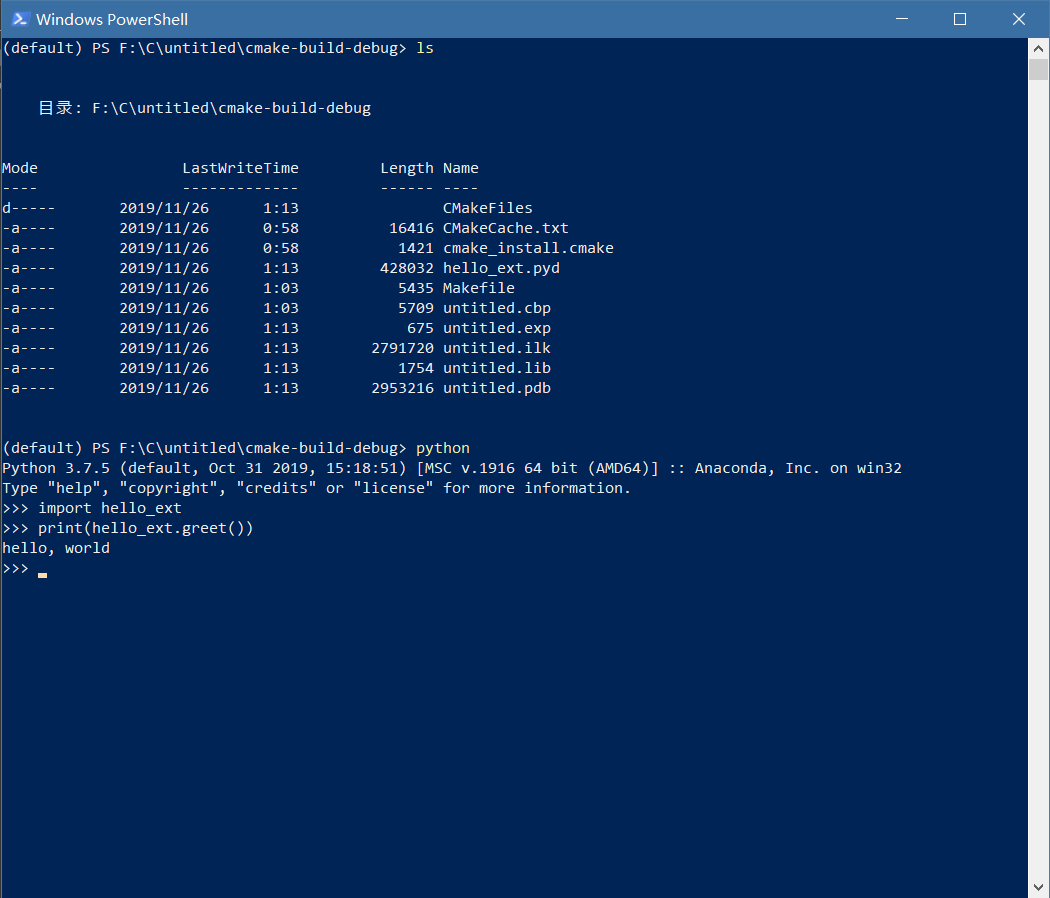
定位到编译结果目录,将 untitled.dll 重命名为 hello_ext.pyd,并打开 PowerShell 运行
1 | |
看到结果,就代表成功了。总的来说 Boost Python 就是将 C++ 编译成了可供 Python 运行的库 (dll, so…) ,并将其后缀更改为 .pyd 即可在 Python 中运行
附录
GCC (MinGW) 的安装可参考 Windows环境下MinGW/gcc安装和环境配置
Boost 静态库/动态库的命名规则
以 Boost.python 为例,如果编译的是静态库(link=static),将会生成单个 .lib 文件:
libboost_python37-vc142-mt-x64-1_71.lib
而如果编译的是动态库(link=shared),将会生成两个文件(.lib 和 .dll):
boost_python37-vc142-mt-x64-1_71.lib. libboost_python37-vc142-mt-x64-1_71.lib
动态库虽然也生成 .lib 文件,但它与静态库的 .lib 文件差别很大。动态库的 .lib 更像是对 .dll 的声明,二者的关系类似于 .h 与 .cpp 的关系。因此,动态库中的 .lib 文件要比静态库的 .lib 文件小得多。
下面以静态库的命名规则为例进行分析:
1 | |
静态库以 lib 开头,动态库开头没有 lib。
所有的库都含有 boost 前缀。
Boost 库名称,本例中为 python37。
编译器名称及其版本,vc142 指的是 msvc-14.2,对应 Visual Studio 2019。
有 mt 代表 threading=multi,没有则代表 threading=single。
有 s 代表 runtime-link=static,没有则代表 runtime-link=shared。
有 gd 代表 debug 版本,没有则代表 release 版本。
目标位数,x32 代表 32 位,x64 代表 64 位。
Boost 库的版本号,1_71 代表 Boost 1.71 版本。